A gathered maxi skirt starts with generous fabric at the hips and an elastic waist that holds it in place. The construction is straightforward: join the panels, fold a casing, insert elastic and hem. Getting the opening and length right before cutting makes those steps much easier.
Choose a woven fabric that gathers without bulk
Use a pattern designed for a pull-on woven skirt, or make a simple rectangular practice version before choosing final cloth. This guide covers one skirt section with a casing folded from its upper edge. Tiered skirts, fitted yokes and separate waistbands need their own cutting and assembly instructions.
Try an opaque, light or medium-light woven with a comfortable drape. Soft cotton poplin or a suitable linen blend can be manageable starting points. Fold a sample into several layers and gather it in your hand: that is a better indication of waist bulk than looking at a single flat layer. Check opacity against a window and against your intended underlayer.
Compare the waist and fullness in Sewlore’s maxi skirt sewing patterns before deciding on construction. Check each design’s fabric, size information, waist finish and current preparation details.
Gather matching thread, a suitable needle, flat casing elastic, a bodkin or safety pin, marking tools and an iron. Prepare the cloth using the care method you intend for the skirt, then press it without stretching the grain. Test a seam and the proposed hem on scraps.
Check the hips before deciding the panel width
Measure your fullest hip circumference and your body at the height where you want the waist to sit. Measure skirt length from that waist position to the intended hem while wearing your usual shoes. Maxi is a proportion, not a fixed number; leave clearance for walking and steps.
A pull-on woven skirt has no zipper to enlarge its opening. Its fabric opening must pass over your hips, and the elastic must stretch far enough to do the same without straining. Cutting the fabric to your waist measurement, then inserting elastic, will not solve a too-small opening.
Use the pattern’s finished measurements and ease guidance when available. Sewlore’s size and measurement guide explains why body measurements and garment measurements are different. Its documented charts apply to the named designs, rather than every skirt.
A hypothetical two-panel calculation
For illustration, suppose the hip measurement is 100 cm. A starting clearance choice of 6 cm gives 106 cm; multiplying that by an illustrative fullness factor of 1.6 gives 169.6 cm, rounded to a 170 cm finished fabric circumference. Neither the clearance nor the multiplier is a universal fitting rule. Assess the fullness in a sample.
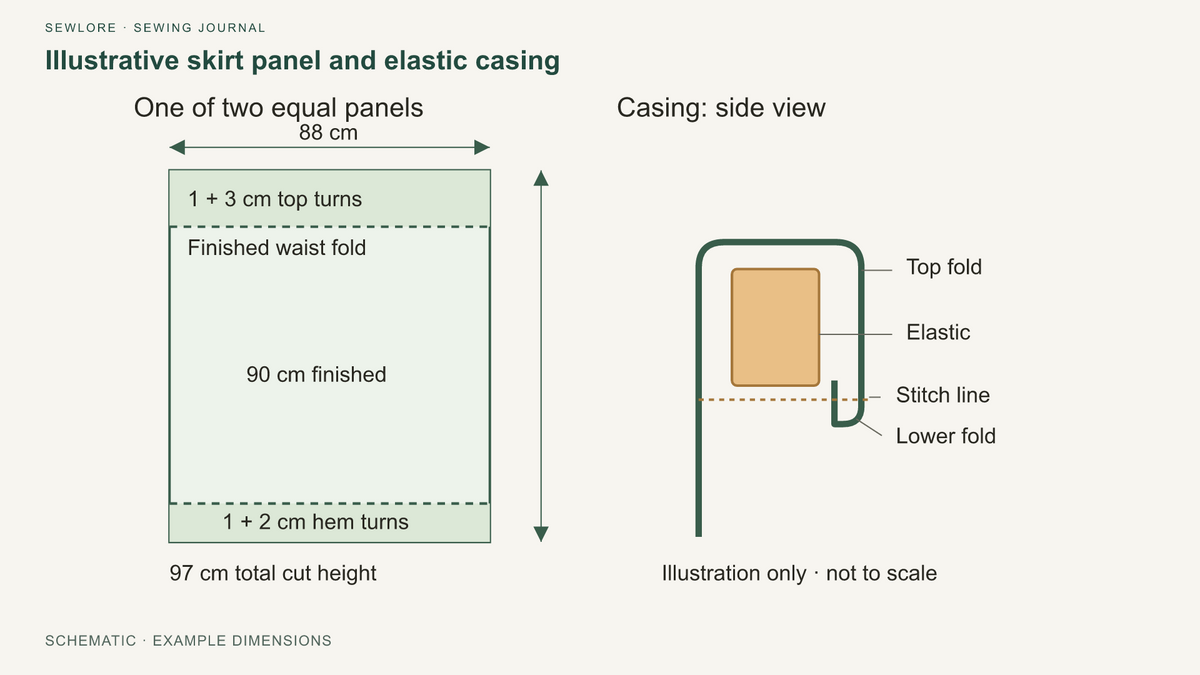
With two equal panels and 1.5 cm seam allowances at both vertical edges, each panel’s cut width is 170 ÷ 2 + 1.5 + 1.5 = 88 cm. Joining both side seams removes four seam allowances in total: 176 − 6 = 170 cm. The ungathered top opening has that same circumference.
Allow for the casing as well as the hem
An integrated casing folds down from the skirt itself, consuming length above the finished top edge. Add both turns to the desired length. Do not add another top seam allowance: there is no waist joining seam in this version.
| Part of the cutting height | Allowance |
|---|---|
| Finished length, from top of waist to hem | 90 cm |
| First top turn, enclosing the raw edge | 1 cm |
| Second top turn, forming the casing | 3 cm |
| Hem: first turn 1 cm, second turn 2 cm | 3 cm |
| Total panel cut height | 97 cm |
Thus, this hypothetical version uses two rectangles measuring 88 × 97 cm. These are planning numbers, not a tested pattern or a size recommendation. A separate waistband changes the length calculation because it adds its own finished height and joining seams.

Cut on grain and join the panels
Keep the panel length parallel to the selvage unless your pattern specifies another layout. Exclude the selvages from usable width. Two 88 cm panels will not fit side by side on cloth 140 cm wide, so the illustrative layout needs two panel lengths, plus any extra for preparation or print matching.
Transfer pocket and alignment marks if your pattern includes them. Attach side-seam pocket pieces at the stage its instructions specify, before closing those seams. The plain rectangular example here has no pockets.
Place the panels right sides together, matching top and bottom edges. Sew both side seams at the chosen allowance, finish the raw edges with an appropriate zigzag or overlock stitch, and press. Keep the upper seam allowances flat so they cannot obstruct the casing.
Fold the casing and fit the elastic
For the illustrative allowance, press the raw top edge 1 cm to the wrong side. Turn that folded edge down another 3 cm and press again. Stitch 2 mm above the lower fold, leaving a short opening for threading. The nominal channel is about 2.8 cm deep before fabric thickness, giving a little clearance around 2.5 cm-wide elastic. Test this combination on a scrap first.
Feed the elastic through with a bodkin or safety pin, securing the other end outside the opening. Keep its face consistent all the way around. Do not cut to a fixed percentage of your waist: different elastics extend and recover differently.
Overlap and temporarily baste the ends securely, removing pins before trying the skirt on. Check that it passes over the hips and stays comfortably at the intended waist when sitting. Adjust the loop, then permanently stitch the overlap with a method suitable for that elastic and trim only the excess beyond the joining allowance. Tuck the join inside and close the casing opening.
Distribute the gathers around the waist. No separate gathering stitches are needed for this version; the fabric opening remains full, and the elastic draws it in. If elastic catches while threading, check for a trapped seam allowance or a section stitched too narrowly before forcing it through.
Check movement, then finish the hem
Wear the skirt with the intended shoes, walk, sit and climb a step. Confirm the waist stays put and the hem clears your feet. Ask someone to mark any uneven areas while you stand naturally; bending to inspect your own hem changes its position.
For the example’s straight hem, turn the raw edge under 1 cm, then 2 cm, press and stitch close to the inner fold. That uses the full 3 cm allowance. If levelling changes the available allowance, mark the finished line and reassess before trimming. A curved or flared pattern may call for a narrower hem instead.
A waist that feels heavy may need less panel fullness or lighter fabric, rather than tighter elastic. A restricted stride points to insufficient skirt circumference or another construction issue; shortening the elastic cannot add room below the hips. Compare other skirt constructions if the gathered pull-on shape does not suit the movement or fabric you want.