The small joins make a button-front shirt look finished: the collar stand meeting the front edge, the cuff enclosing the sleeve, and the two fronts hanging at the same length. Most of those joins become easier when you prepare the marks and sew each detail while it is still accessible.
This guide covers an adult woven shirt with a separate collar and stand, a full button front, and either short sleeves or long sleeves with opening cuffs. Use it alongside a pattern that supplies the pieces, seam allowances and fitting information. A camp collar, a hidden front opening or a different cuff needs its own construction sequence.
Choose the fabric and settle the fit first
A stable cotton shirting lets you see folds and stitch lines clearly. Poplin gives a crisper result; a softer woven fabric produces more drape. Choose from the fabrics recommended for the pattern rather than substituting jersey or a much heavier cloth.
Check the chest or bust, shoulder shape, upper arm, neck, and sleeve length against the pattern's body and finished measurements. If the fit is unfamiliar, make a trial garment in a comparable woven fabric before cutting the final cloth. It should let you sit, reach forward and bend your arms without forcing the front open.
Compare Sewlore's shirt sewing patterns for the silhouette and details you want. For a project specifically drafted as menswear, the men's shirt sewing patterns collection provides a more focused starting point. Check the individual design's specifications before choosing.
Prepare the pieces in the order you will use them
Prepare the fabric for its intended care, press it, and cut the required mirrored pieces on the stated grain. Label the sleeve fronts and backs. Transfer neckline notches, placket folds, pocket positions, sleeve openings, pleats and cuff marks before removing the paper.
Apply interfacing only where the pattern specifies it. Test the fabric and interfacing together with the recommended heat, pressure and cooling procedure first. A collar that becomes board-like on the test scrap will not soften just because it is attached to the shirt.
Make a short list of seams that need finishing as you go. An overlocked or zigzagged plain seam and a flat-felled seam use different handling; confirm that the chosen finish works with the supplied allowance. Stabilize the neckline as directed, before repeated handling can stretch it.
Finish the front opening while the fronts lie flat
Identify the overlap and underlap from the wearer's perspective. Some fronts fold back on themselves; others use a separate placket. Do not trim off an integrated extension to follow a tutorial for a sewn-on band.
For a separate placket, sew the designated band edge to the correct front, right sides together. Press the allowances toward the band, then form its marked folds so the remaining raw edge is enclosed. Secure the folded edge with the stitching specified for that construction. On a folded front, press the successive folds at their marked positions and stitch the inner edge down.
Lay the fronts together at the intended overlap. Their neckline and hem reference points should agree. Correct a misfolded band now, before it changes the neckline length. Add patch pockets while you can still support the front flat on the machine bed.
Join the back, yoke and shoulders
Sew any darts and form the back pleat as marked. Baste pleats within the seam allowance so they hold their position during the next seam.
Place the back between the two yoke pieces: the outer yoke's right side against the back's right side, and the inner yoke's right side against the back's wrong side. Stitch, then press both yokes upward.
For a burrito finish, join the fronts to the outer yoke at the shoulders. Roll the loose front and back sections toward those seams, leaving the inner yoke free. Bring the inner yoke around the roll and match the shoulder edges, enclosing the front shoulder allowances between the yokes. Stitch without catching the rolled shirt. Pull the shirt through the open neckline, press, and add any specified topstitching.
If the pattern has a single yoke or ordinary shoulder seams, use that construction instead. Check that the back hangs freely before proceeding to the neckline.
Build the collar without mixing two methods
The following is a stand-first sequence for a separate two-piece stand. If your instructions assemble the collar and stands before attaching them to the shirt, follow that complete method, including its front-corner finish.
- Sew the upper and under collar right sides together around the outer perimeter, leaving the lower attachment edge open. Grade the allowances, reduce corner bulk without cutting the stitches, turn, and press. Add the specified collar topstitching.
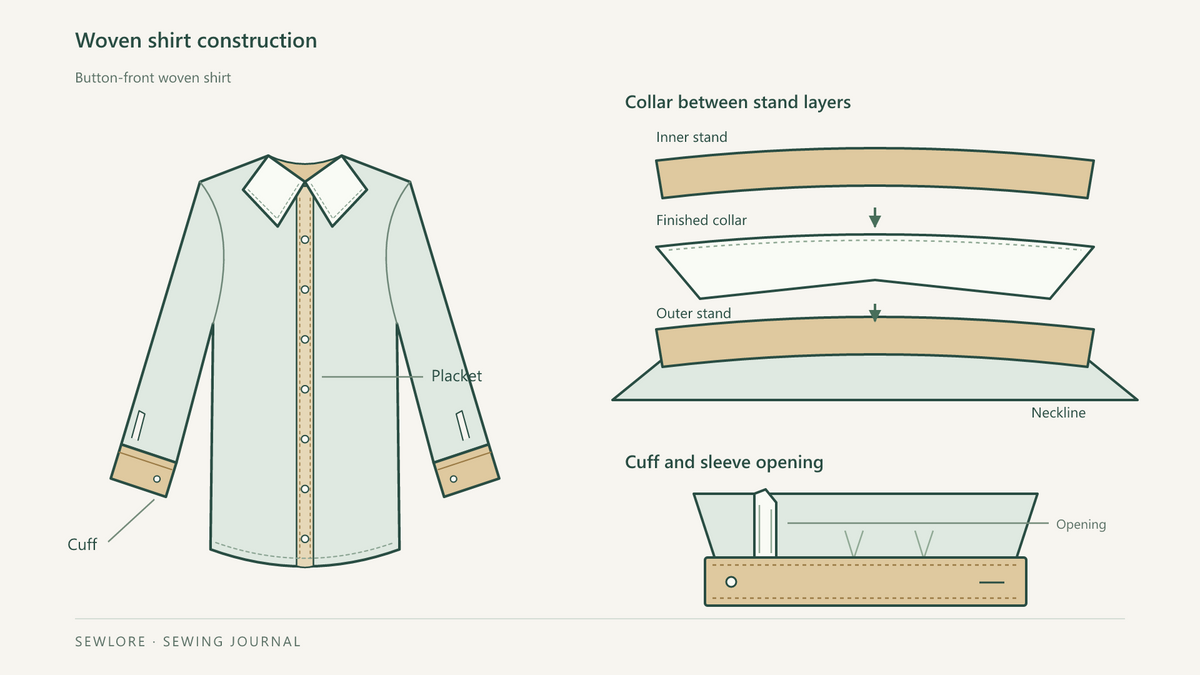
- Sew the outer stand's lower edge to the shirt neckline, right sides together, matching center back and the other balance marks. Its front seam allowance extends beyond each finished placket edge. Ease the neckline curve into position without stretching it; press the allowances into the stand.
- Baste the collar's open edge to the upper edge of the outer stand at the matching marks. Keep it clear of the stand's front-corner seam allowances.
- Press the inner stand's lower allowance to its wrong side. Place it right sides together with the outer stand, enclosing the collar. Sew the upper edge and front curves, keeping the shirt out of those stitches. Trim and grade, turn, and press.
- Cover the neckline seam with the inner stand's folded edge. Baste it securely, then stitch as directed, checking that the fold is caught throughout.
Before the final stitching, compare both stand ends with the fronts overlapped. They should meet at the intended height. Correct a missed fold or uneven corner while the lower edge is still accessible.

Prepare sleeve openings before closing the sleeves
For long sleeves, make the required opening while each sleeve lies flat. A tower placket, a continuous bound opening and a faced slit are different constructions. Practice the chosen one on a scrap before cutting the opening in the sleeve.
For a tower placket that uses a stitched box, transfer its opening and corner marks accurately. Attach the placket and stitch the box before slashing the center and clipping toward its corners. Stop short of the stitches. Turn the placket through, enclose the narrow side, then fold and secure the tower side as the pattern shows. Keep the lower sleeve free when securing the tower top so you do not sew the opening shut.
Set sleeves in flat if the pattern calls for it, matching front, back and shoulder marks before sewing the underarm and side seams. For a set-in sleeve, close the sleeve and body seams first, then insert it into the armhole. Distribute any specified cap ease without forming accidental tucks; finish and press the seams.
Attach the cuffs and finish the hem
Form the marked wrist pleats or gathers before attaching cuffs. Compare the reduced sleeve edge with the cuff's attachment marks, accounting for any cuff extension. Do not stretch the cuff to absorb a misplaced pleat.
For a folded cuff designed to enclose the sleeve edge, prepare its folds and sew the short ends as instructed, then turn and press. Position the sleeve inside the cuff at the marked stitching line, with its opening edges at the correct ends of the cuff. Baste through the layers and secure the cuff, keeping every raw edge inside. Check the overlap on both wrists before sewing buttonholes.
Short sleeves may need a narrow hem, a facing or a band instead. Finish the shirt hem with its specified method too. On a turned curved hem, press small sections without pulling the curve; check both front ends at their intended overlap before stitching.
Place the fastenings on the finished shirt
Try the shirt with the fronts held at their intended overlap. Check buttonhole positions against the pattern, especially across the chest or bust and at the collar stand. Sew a test hole through the same fabric, interfacing and number of layers, in the same direction. Cut it open and pass the actual button through before stitching the garment.
Cut the finished buttonholes carefully within their stitched boundaries. Align the fronts again and transfer the button positions through the holes. Attach the buttons, allowing enough space beneath them for the overlapping fabric, and fasten the shirt for a final check.
If the front gapes, check its intended overlap and ease before adding another button. If a cuff or collar fold escaped the securing stitches, open the affected section and baste it into position. If the stand seems too long, first check the front folds and compare the neckline and stand at their seamlines; trimming the end immediately can hide the real error.
Finish by checking the shirt both open and fastened: fronts level, collar ends balanced, cuffs closing comfortably, and no caught folds inside. Press with care around the buttons and enclosed seams.