Comfortable pajama pants need room through the seat, enough length in the rise and a waistband that stays in place without digging in. An elastic waist can adjust the waist fit, but it cannot make a narrow woven opening pass over your hips or create missing room at the crotch.
This guide follows adult, unlined pajama pants with separate front and back leg pieces and a fold-down elastic casing. You will make two leg tubes, join them through the crotch and adjust the elastic before finishing the hems. Use your pattern's allowances and markings throughout. Designs with a separate waistband, pockets or a fly need their own additional steps.
Choose a pattern and fabric that work together
Start with a pattern intended for loose-fitting woven pants. Check its recommended fabric, finished measurements and waistband construction. When comparing Sewlore's pajama and sleepwear sewing patterns, read the individual design's sizing, contents and preparation details before choosing your project.
Cotton shirting and soft cotton flannel are manageable choices when your pattern recommends them. Cotton lawn makes lighter pants, but check its opacity against your skin. Drapey rayon can feel pleasant and move well, although its tendency to shift requires more care during cutting.
Wash and dry the cloth as you intend to care for the finished pants, following its care instructions. Press it smooth without pulling it out of shape. You will also need matching thread, a suitable machine needle, the specified elastic, fabric scissors, pins, a removable marker, a ruler and a safety pin or bodkin. Buy fabric from the pattern's cutting plan, allowing for shrinkage and any print matching.
Check the rise, hip room and length before cutting
Choose the size using the pattern's body measurement chart, then examine its finished hip measurement. Woven sleepwear needs movement room; choosing a smaller size to reduce gathering at the waist can make the seat uncomfortable. Sewlore's size guide explains the distinction between body measurements and finished dimensions.
Find where the finished waistband is meant to sit. The rise is the distance from the crotch to that waist position, so a low-rise design will not reach a higher waist simply because the elastic is tightened. Make length adjustments at the marked adjustment lines, keeping corresponding front and back changes equal.
A trial pair in similar cloth lets you check sitting and bending before using your final fabric. Preserve the casing and hem allowances when changing length. For a PDF, check the scale and assemble the pages using the printing and assembly guide before tracing your size.
Cut two mirrored fronts and two mirrored backs
Identify every piece by its label. The back often has a longer crotch extension or higher waist edge, but shape alone is not a reliable substitute for the pattern's labels.
For a two-layer layout, fold the fabric with right sides together and follow the cutting plan. Keep each grainline parallel to the selvage, checking the distance at both ends of the arrow. Directional prints and fabrics with a nap need all leg tops facing the same way.
Cut one mirrored pair of fronts and one mirrored pair of backs. For single-layer cutting, turn the paper piece over for the second member of each pair. Transfer notches, casing lines and other required marks before lifting the paper. Mark the wrong sides with removable chalk inside an allowance if the fabric looks similar on both sides. Lay out one front and one back for each leg.
Sew and press each leg
Place a matching front and back right sides together. Align the outer leg seam using the notches, pin and stitch at the specified allowance. Finish the raw edges with the pattern's recommended method and press the seam as directed. A zigzag or overlocked finish is suitable for many woven fabrics; test on a scrap to make sure it controls fraying without curling the edge.
Match the inner leg edges from the crotch to the hem, aligning the notches. Sew, finish and press that seam. Repeat for the other leg. If a pair of edges refuses to align, check the piece labels and notches before stretching or trimming anything. You should now have two separate tubes with their upper crotch curves still open.
Nest the legs to sew the crotch seam
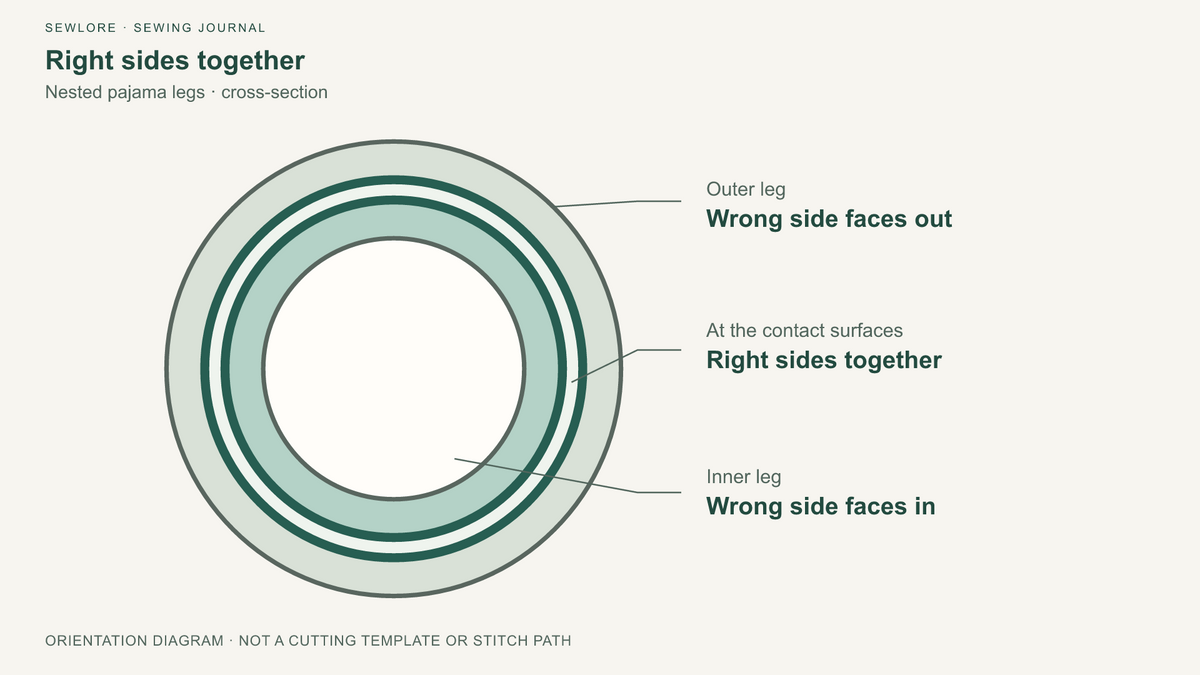
- Turn one leg right side out. Leave the other leg wrong side out.
- Slide the right-side-out leg into the other leg through its upper opening. The two fabric right sides should face each other.
- Match the inseam junction, then the front and back crotch edges and their notches. Check that the leg tubes are untwisted.
- Pin the continuous curve from the front waist edge, through the crotch, to the back waist edge. Keep the rest of the fabric clear of this line.
- Sew at the specified allowance, moving slowly over the seam junction. Add any reinforcement required by the pattern, then finish the raw edge and press.

Pull the inner leg back out to open the pants. Check that the crotch seam joins the two legs cleanly, with no extra folds caught underneath.
Make a casing that lets the elastic move
Press the waist edge inward by the amounts marked for the fold-down casing. The first fold encloses the raw edge; the second creates the channel. Keep the folds even through the seam intersections.
Before stitching, compare the available channel width with your elastic. It should hold the elastic flat while leaving room for it to slide. Remember that stitching near the lower fold reduces the usable space. Do not change the casing depth without checking how that changes the finished rise.
Stitch near the inner folded edge, leaving the specified insertion opening. Secure the stitching at both ends. Check that bulky allowances have not blocked the channel.
Adjust the elastic with the pants on
Use the elastic type and width recommended for the design. Start with its suggested length and joining allowance; different elastics stretch and recover differently, so a universal “waist minus” calculation is unreliable.
Attach a safety pin or bodkin to one end and feed it through the casing. Secure the loose end outside the opening so it cannot disappear inside. Work in short sections, spreading the gathered cloth as you go.
Check that the elastic lies flat all the way around. Temporarily secure its ends with closed safety pins, then try on the pants. Sit, bend and take a few steps. The waist should feel secure without pressure, and the waistband should stay at the intended position.
Join the ends using the overlap and stitch recommended for your elastic and pattern. Distribute the gathers evenly, close the insertion gap without catching the elastic, and add a small back marker if useful. Where the pattern permits, short anchoring stitches at seam positions can reduce twisting.
Finish the hems and resolve any remaining pulls
With the waistband settled in place, mark each finished leg length. Leave the intended hem allowance below that line before trimming. Press the folds, stitch around each opening without catching the other side of the leg, and give the pants a final press suited to the fabric.
If the waist presses when sitting, reassess elastic tension. If the crotch pulls or the back waist drops despite comfortable elastic, check hip ease and rise on a trial pair; tightening the waistband will not supply that missing room. A twisting leg calls for checking mirrored pieces, seam matching and grainline placement. A rolling waistband calls for checking elastic orientation, casing width and the design's anchoring method. Correct the cause before making another pair.