A pattern piece tells you more than the shape to cut. It tells you which direction the fabric should face, how many pieces you need, and where those pieces will meet. Reading that information while the paper is still on the fabric saves a great deal of guessing at the sewing machine.
Keep the instructions beside the pattern sheet. A dashed line can mean a size, a stitching line or a fold, depending on the publisher. The legend for your edition takes precedence over any general symbol chart. Start with one piece and follow its marks all the way through the instructions before laying out the rest.
Begin with the label, not the outline
Find the piece name, number, size and cutting quantity. Then check which garment view uses it. A sleeve facing for one version may be unnecessary for another; cutting every shape on the sheet wastes fabric and makes the project harder to organize.
Read the material as well as the quantity. “Cut two” in the main fabric is different from “cut two” in interfacing. A facing can resemble part of the bodice but serve a different purpose. Write a small piece list with separate columns for fabric, lining and interfacing, and tick off each item as you cut it.
A pair usually needs left and right versions. If you cut on a single layer, turn the paper over for the second piece when the layout calls for a mirrored pair. Two identical sleeves facing the same way are not a mirrored pair. Check directional prints and the required right-side orientation before moving the template.
If you are choosing a size, use the measurements supplied for that edition. Sewlore's size guide explains the distinction between body and finished garment measurements. For a PDF, verify scale before treating any printed outline as usable; the printing and assembly guide covers that preparation.
Know which line to cut and where the seam will sit
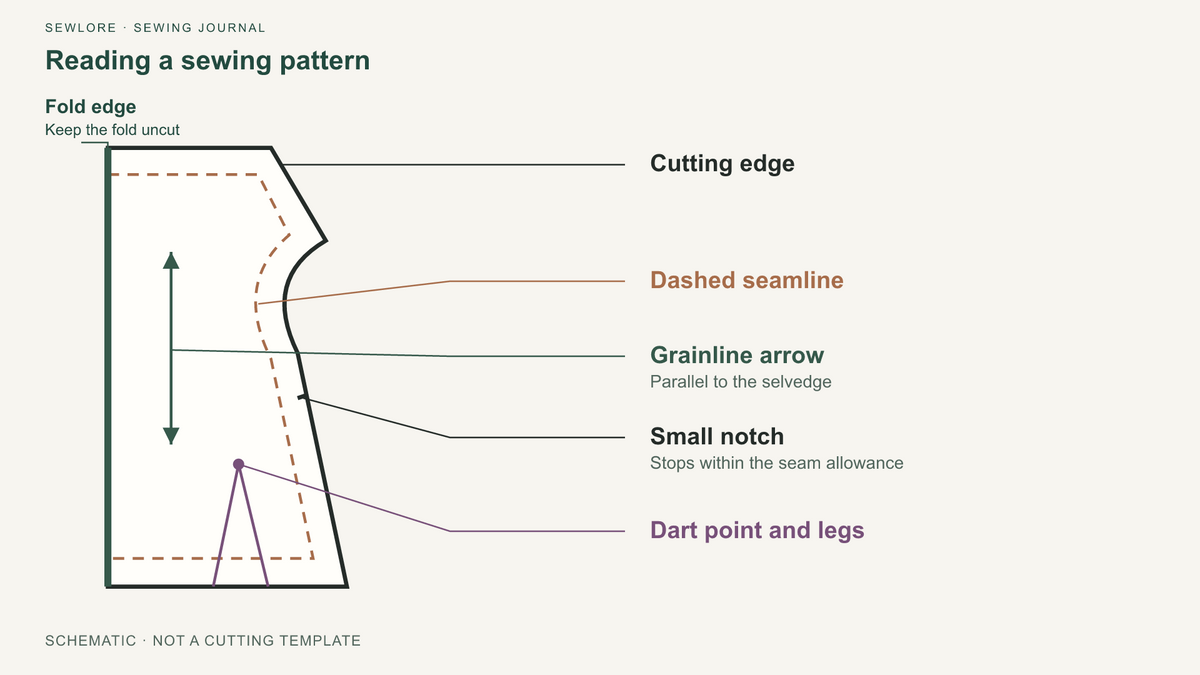
The cutting line is the boundary of the fabric piece. The seamline is where the joining stitches go. When seam allowance is included, the cutting line lies outside the seamline. Some patterns print both; others show only the cutting line and state the allowance in the instructions.
Look for an explicit allowance statement before adding anything. An included allowance must not be added a second time. A pattern without allowance needs the specified amount added to the relevant edges before cutting. Necklines, enclosed seams and hems may have different allowances, so one number written at the top of the booklet does not settle every edge.
For example, if an illustrated edge has a ⅜-inch allowance included, the joining stitches sit ⅜ inch inside that cut edge. The outer line is still the cutting line. This example describes how to read the distance; it does not prescribe an allowance for your pattern.
On a multisize sheet, follow the correct line style around the entire piece. Where several sizes meet, trace through the intersection rather than jumping to the nearest line. Check the matching size at notches, dart legs and corner marks too. A hem fold line is an instruction for turning fabric, not another size to cut.

A grainline controls direction; a fold mark controls an edge
A lengthwise grainline arrow normally sits parallel to the fabric's selvedge, its finished lengthwise edge. A bias or cross-grain layout needs its own stated orientation. Do not rotate a piece simply because it fits into a spare corner of the fabric.
Measure from one end of the arrow to the same selvedge, then from the other end. Adjust the paper until those distances agree. For instance, readings of 6 inches and 6½ inches show that the piece is tilted. After correcting it, secure the arrow's ends and then the rest of the piece.
A place-on-fold mark means that the indicated paper edge sits directly against an uncut fabric fold. Cutting around the other edges creates a whole piece when the fabric opens. Cutting along the marked fold would split it. An internal fold line, such as one used for a pleat or placket, has a different job: it tells you where to fold the cut fabric during construction.
Transfer the marks you will need after removing the paper
Notches identify matching points. Preserve their position and their count: a double notch is not interchangeable with a nearby single one. If you mark with a snip, keep it small and wholly within the available seam allowance, well short of the future stitches. Where the allowance is narrow or the fabric frays easily, use a removable mark or outward notch instead of cutting inward.
Internal dots and crosses can locate a pocket, a dart tip, a gather limit or a point where stitching stops. Find the associated instruction before deciding what to do. A hole in paper is generally a way to transfer a position; it is not permission to punch a hole in the fabric.
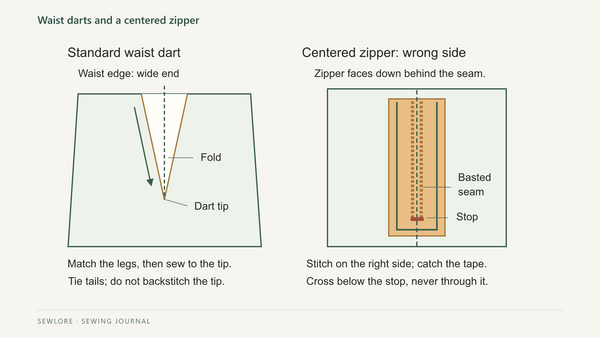
For a dart, identify both legs and the point for your selected size. Transfer the point and the leg positions to each fabric layer, usually on the wrong side, then draw the lines with a suitable removable marker. Fold so the legs meet; do not cut out the wedge unless the instructions specifically call for a cut dart. Pin marking or tailor's tacks can transfer the point to both layers without shifting the paper.
Test any marker on a scrap before using it. Check removal after the heat or washing the garment will receive. Mark each layer while you can still locate it accurately, and keep the paper attached until you have checked that all required marks are present.
Read button and buttonhole marks together
A short barred line commonly locates a buttonhole; a cross or circle may locate its button. Confirm which front overlaps and whether “right” means the wearer's right. Transfer the buttonhole positions to the correct piece, keeping their direction as shown.
Recheck the placement on the assembled garment before stitching the holes. Once they are sewn, align the fronts at their intended overlap and transfer the corresponding button positions through the finished holes. That check helps accommodate small changes caused by sewing and pressing instead of assuming every initial mark remained exact.
Resolve doubtful marks before cutting the next piece
If a notch seems missing, place the paper back on the fabric, aligning the edges and other marks, and transfer it again. If two pieces appear not to match, check the piece numbers, chosen view, size lines and seamlines before trimming either piece. Raw edges on curves do not always tell you how the seam will join.
Before removing the last template, check five things: the cutting quantity, the fabric direction, the correct size line, the allowance for each edge, and every mark used in the next sewing steps. Keep the cut pieces labeled and grouped with their matching facings or interfacing.
When you compare Sewlore's dress sewing patterns or blouse sewing patterns, look beyond the outline to the construction of the design you choose. Once its marks make sense on paper, you can cut with a clear picture of what each piece will do.